Shared hosting servers are designed to host multiple websites on a single server.
Which is sharing its resources, including CPU, RAM, and memory, from one dedicated server to multiple hosted websites. This is why shared hosting is slow.
Therefore, it’s not an ideal solution for medium-to-high-traffic websites due to its limited bandwidth, limited storage, low CPU core count, lower security, and other crucial factors that we need to know before considering any hosting services out there.
Namecheap is one of the best domain registrars that offers three different web hosting plans in their shared hosting category: Stellar, Stellar Plus, and Stellar Business.
But, in this guide, I’ve covered my in-depth experience with the Namecheap Stellar Business plan review — what’s good and bad, and why the Stellar Business is the best option compared to the Stellar Plus and Basic Stellar Plans.
So, let’s get started.
Namecheap Shared Hosting Review
Namecheap Shared Hosting Review
The Verdict:
If you are looking for a reliable and affordable web hosting plan to build your new website or migrate your existing websites, the Stellar Business Plan from Namecheap Shared Hosting is the ultimate choice.
Features
Namecheap Cloud Storage Server
The Namecheap Stellar Business plan differs from its Stellar and Stellar Plus plans in shared hosting servers. Stellar Business is hosted on a cloud server distributed across multiple data centers to provide true stability and zero downtime with the highest performance, whereas the Stellar and Stellar Plus plans produce data from a single-based server.
This means if one of the servers fails or goes offline, then your website will not face downtime because there are still more servers that have also pre-stored your website data and are ready to provide your request in real-time.
However, Namecheap Stellar Business is not a cloud hosting service, but it looks like a cloud-shared hosting server where three different data centers are integrated by state-of-the-art shared cloud data center technology.
Data Server Types and Location
The Namecheap shared hosting servers are developed with CloudLinux, based on the CentOS operating system, and use the LiteSpeed web server. Previously, they used Apache as their web server software.
LiteSpeed uses minimal server resources to handle high workloads between servers and browsers. They provide one-stop web acceleration solutions that embrace and advance cutting-edge technologies for web servers, load balancers, and cache solutions.
Their data centers are located in the USA, the United Kingdom, and Europe. By default, shared hosting, e-mail servers, VPS carriers, and dedicated servers are located in Phoenix, Arizona, USA; UK servers are located in Nottingham, in the Midlands, and EU data centers are located in Amsterdam, Netherlands.
Number of Sites
The Namecheap basic Stellar plan gives you the ability to add up to 3 addon sites on the same hosting account, whereas both the Stellar Plus and Stellar Business plans offer an unlimited number of websites you can host, which is why people love them.
Also, you can add unlimited subdomains for each domain you’ve added on cPanel when you get the Stellar Plus and Business plans, but with the Stellar plan, it is capped at 30.
E-mail Accounts
A professional email address is essential, and using it with your domain name makes it trusted for customers to look up your company and your website for more authenticity. And many of the hosting providers offer it as a paid service, which is still worth every penny.
Surprisingly, Namecheap offers unlimited e-mail accounts for FREE for the first year of hosting purchased. After your free trial, you can extend your private subscription from the $14.88 starter plan every year.
However, this entry-level service doesn’t offer the same features as their professional business email. With hosted business email, you get a professionally developed email service for your domain that provides you with a variety of security, management, and spam filtration services that guarantee the best experience for managing your e-mail accounts.
Privacy and Security
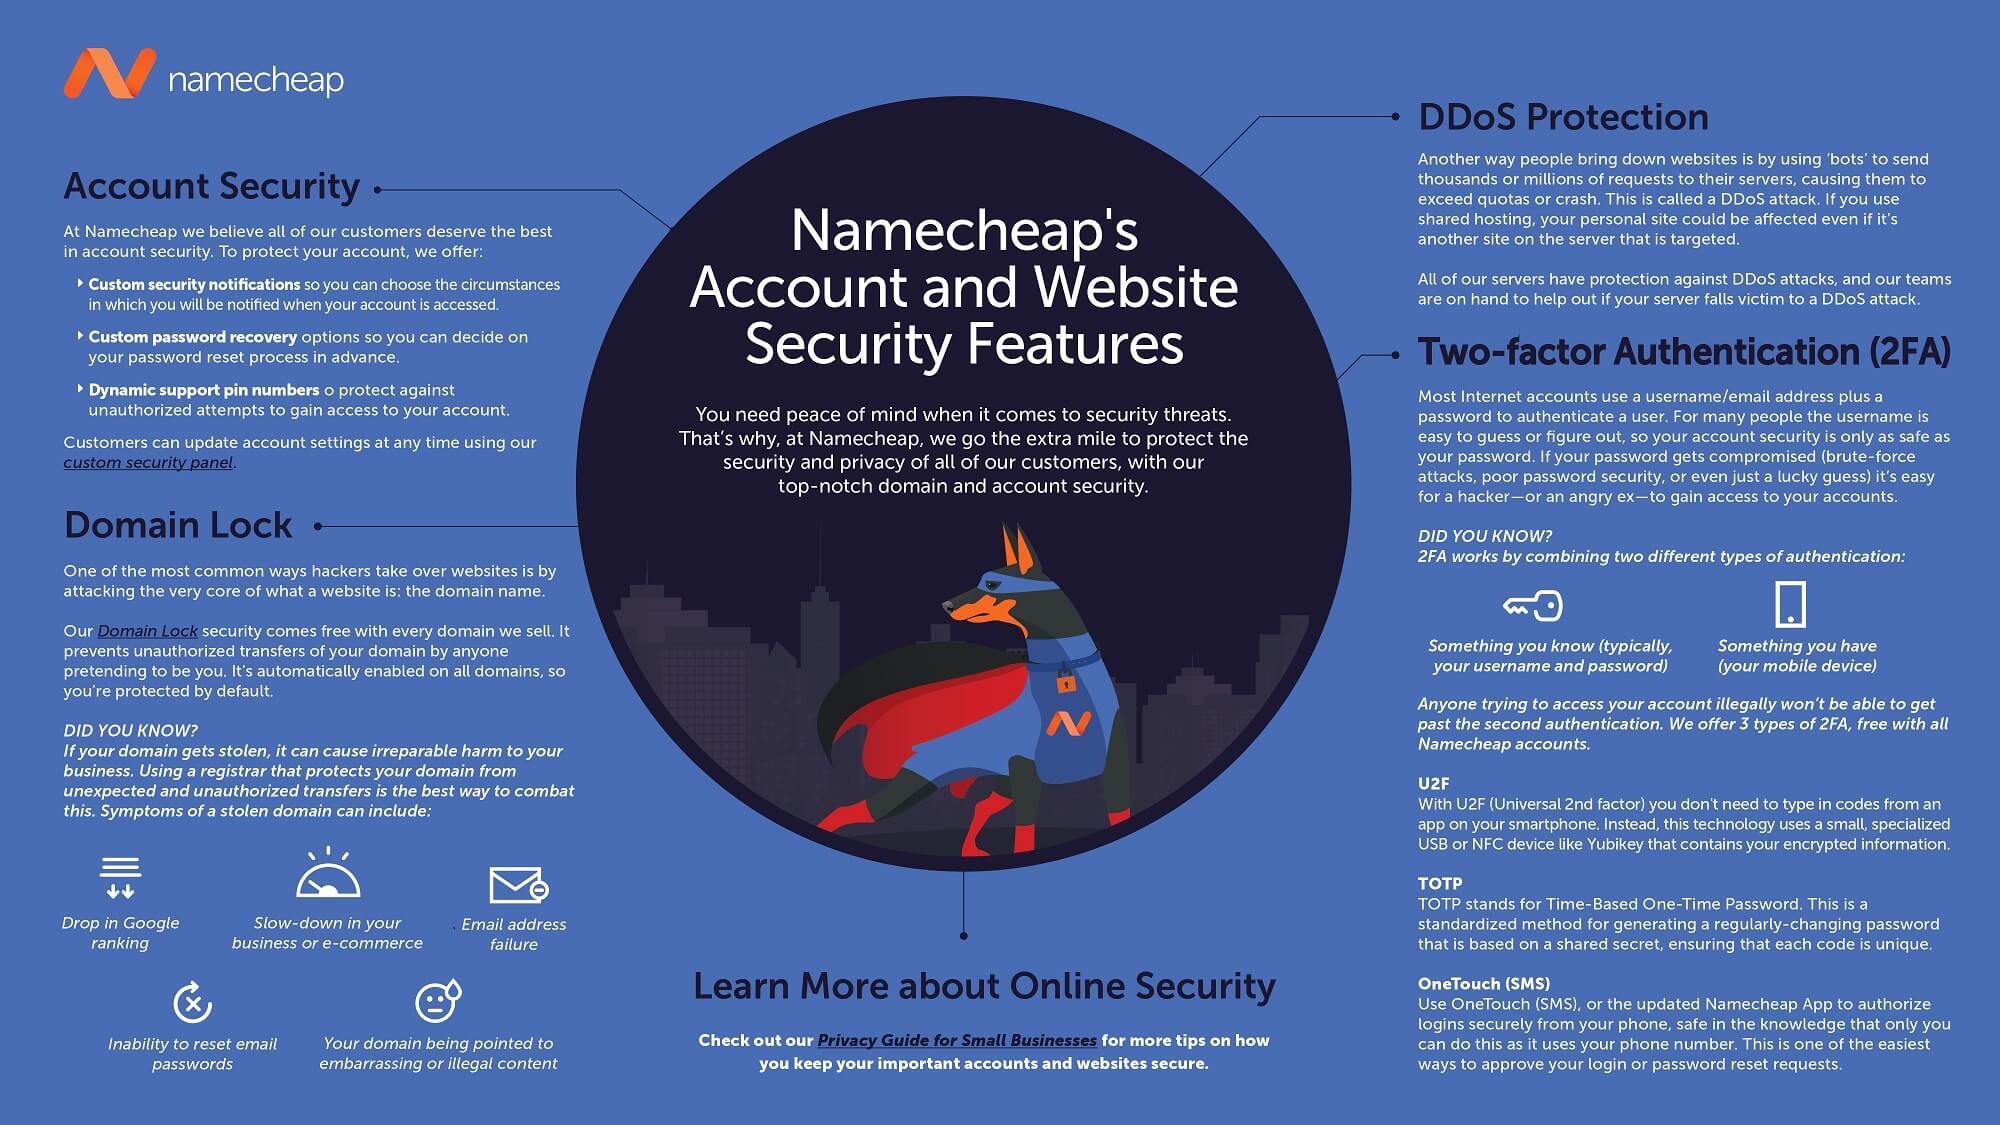
Namecheap is straightforward about security. Provides essential security, including DDoS attacks, two-factor authentication (2FA), one-touch SMS for logging into the account, a random PIN for live chat support, and cPanel-level Mod Security and 2FA for all of their hosting plans.
If you’re serious about your data security, make sure you’re considering any cloud storage server for more benefits and Auto Backup, which is great for protecting your websites from any system failure or human error.
They do not provide any free malware detection and removal tools, a network firewall, or other powerful security services. However, for a premium service, Namecheap offers SiteLock Website Security to protect against viruses and online threats.
Backups
Namecheap’s cPanel AutoBackup tool automatically creates backups for all the Stellar plans twice a week. But Stellar Plus and Business customers have access to daily, weekly, and monthly backups.
Also, you can use any additional backup plugin to store your website data on a local server or any remote storage (Google Drive, Dropbox, etc.). Recommended WpVivid backup or UpdraftPlus free backup plugins that can help you take a backup and restore or migrate your website.
Dedicated IP
They offer dedicated IP for a fixed $2.00/mo fee for all the Stellar plans. It refers to the unique number that is linked to all your online activity.
The best thing is that your domain will not be associated with the impact of someone else’s negative work on the same shared server. However, it is worthless when you use custom nameservers for Cloudflare NS instead of Namecheap. Because your IP address will be changed to the Cloudflare IP address, for example:
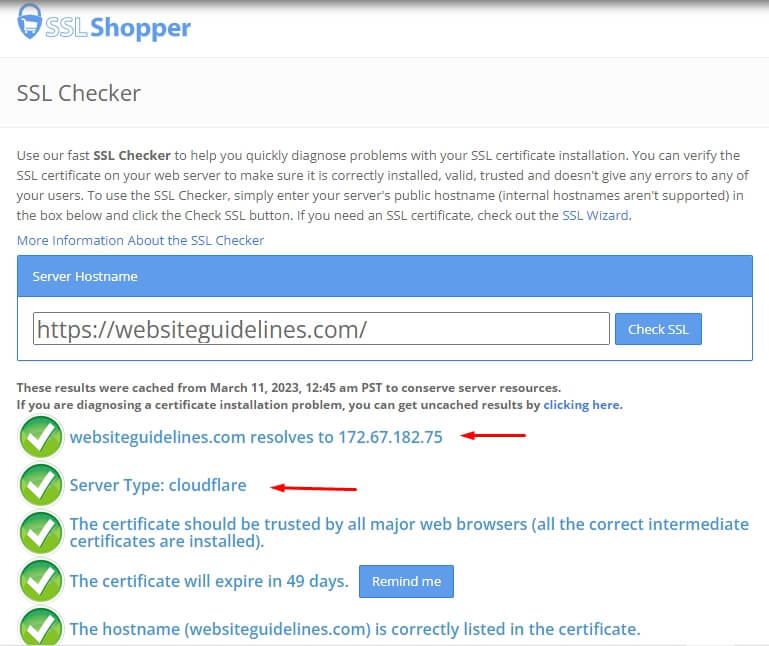
As you can see in the image above, the Website Guidelines use the CloudFlare CDN, and as a result, the CloudFlare IP address is being used to connect to my site instead of my web hosting IP address. So it means that if I use a dedicated IP, then I will not have a different benefit.
Overall, Namecheap provides everything you can get from a shared hosting plan. But the only flaw is that they do not offer a free .com domain with any of their annual plans, whereas most other providers do.
Ease of Use
Control Panel
Namecheap provides the most reliable and intuitive server and site management platform, which is cPanel. The cPanel is best for those who are looking for a fully controllable and highly customizable hosting management tool.

Otherwise, Namecheap EasyWP offers a beginner-friendly built-in dashboard to manage your WordPress website with limited controls and features. Also, they do not offer multi-site in a single hosting plan.
Content Management Systems (CMS)
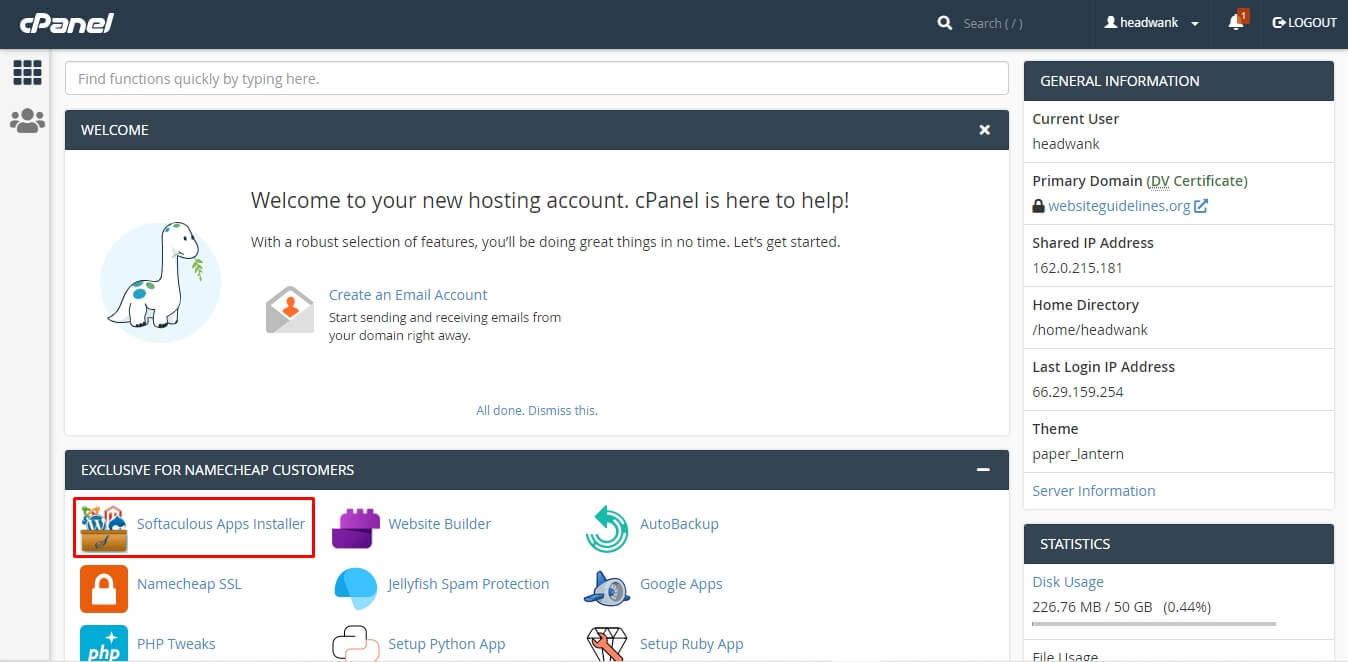
Namecheap provides Softaculous Apps Installer, which is an auto-installer and fully compatible with cPanel. Softaculous is much faster and better designed, and it installs all scripts in a minute.
You can install and host the most popular CMS, including WordPress, Joomla, Drupal, AbanteCart, and many more.
Adding a New Site (Step-by-step process)
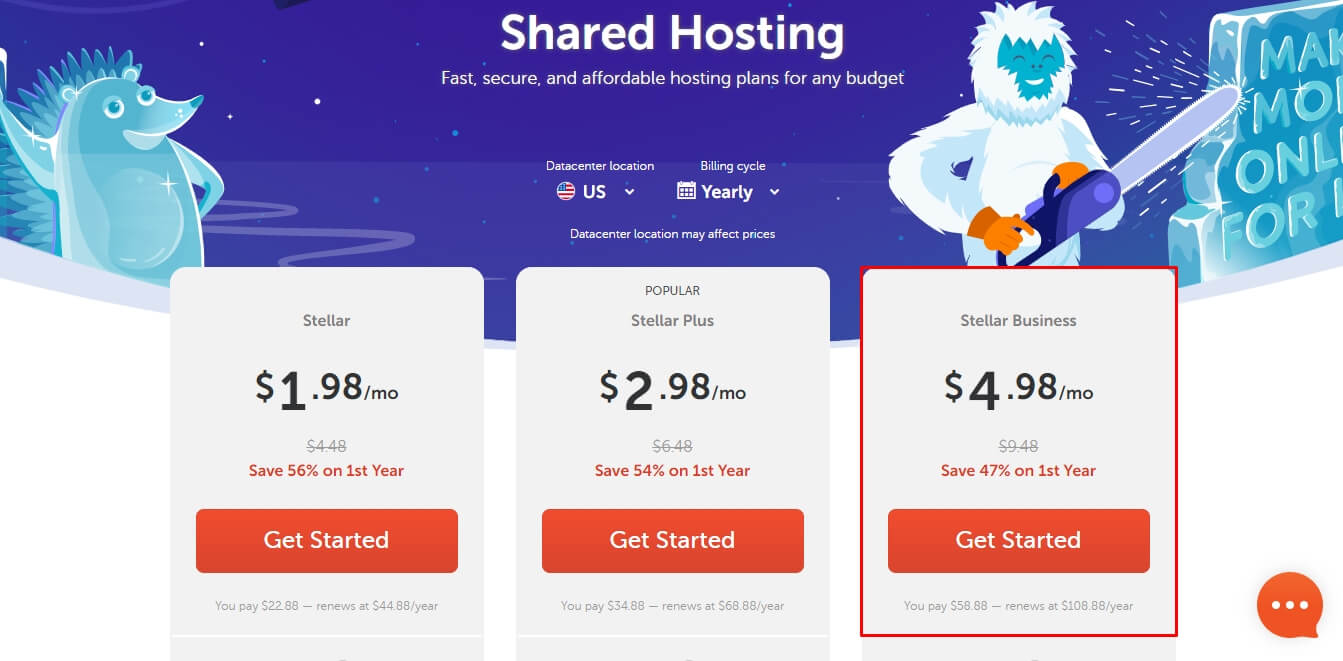
Once you select any shared hosting plan from Namecheap, make sure you choose the right data center location and billing cycle, then click on “Get Started“.

Then you’ll get a domain connection page where you need to connect your domain.

Either you add a New Domain Name, an Existing Domain Name from this account, or an Existing Domain Name from Your Third-Party Domain Name aka (from other domain providers). I’m adding flippa.com as an example and then “Connect To Hosting.”
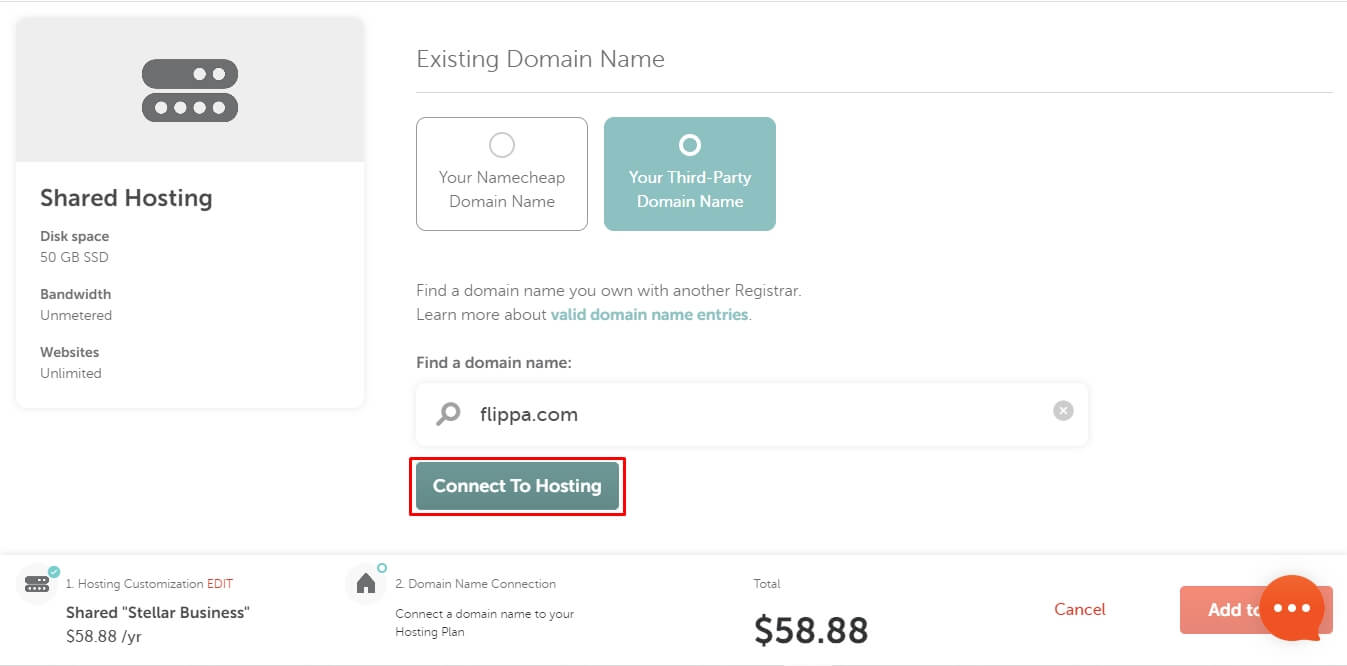
When the domain is connected, click Add to Cart, recheck the information, and Confirm Your Order.
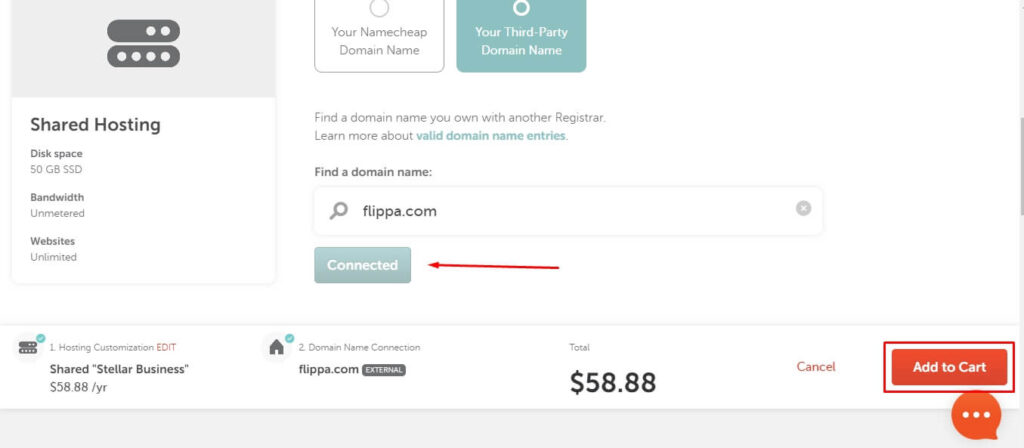
You can change your primary domain anytime by contacting Namecheap Live Support. So you can order your hosting plan with any domain name and change it later!
# Creating additional domains to the same hosting account
As we already know, Namecheap offers unlimited domains to the same Stellar Plus and Business accounts. So here’s the guide on how to add additional domains.
After getting your hosting account, you need to go to the cPanel from your Namecheap Hosting account page.
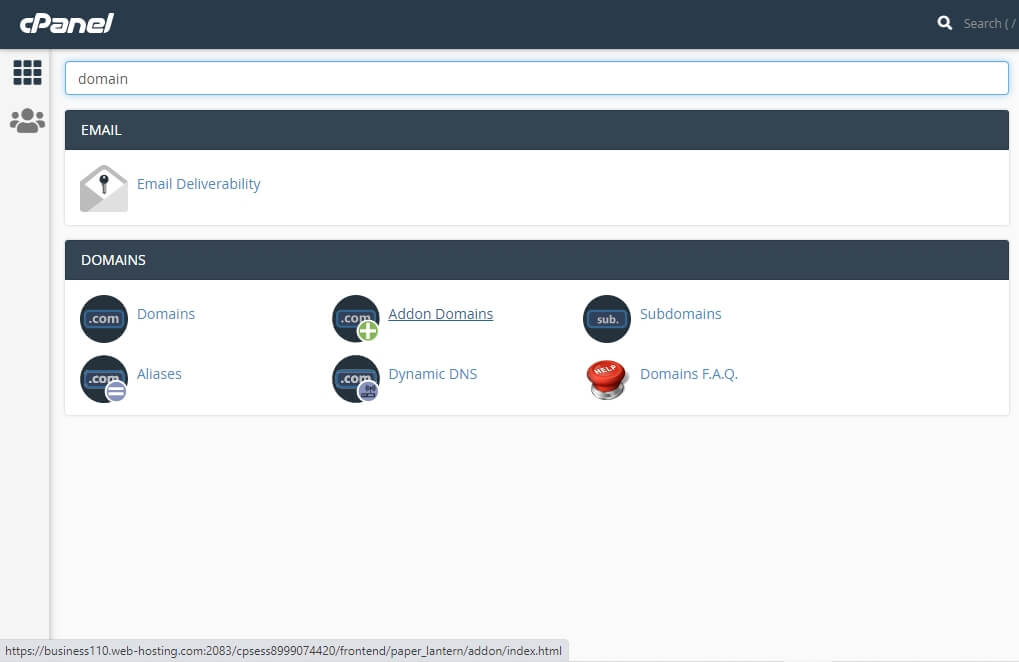
From cPanel, simply search “domain” and click Addon Domains.
From there, you can create your domain. Put your domain name into the New Domain Name box, and then Subdomain and Document Root will automatically fill out the box with a default value; however, you can always change these and click on Add Domain.
For this step, I’m using “websiteguidelines.org” to create an addon domain when another domain is selected as a primary domain for my hosting account.
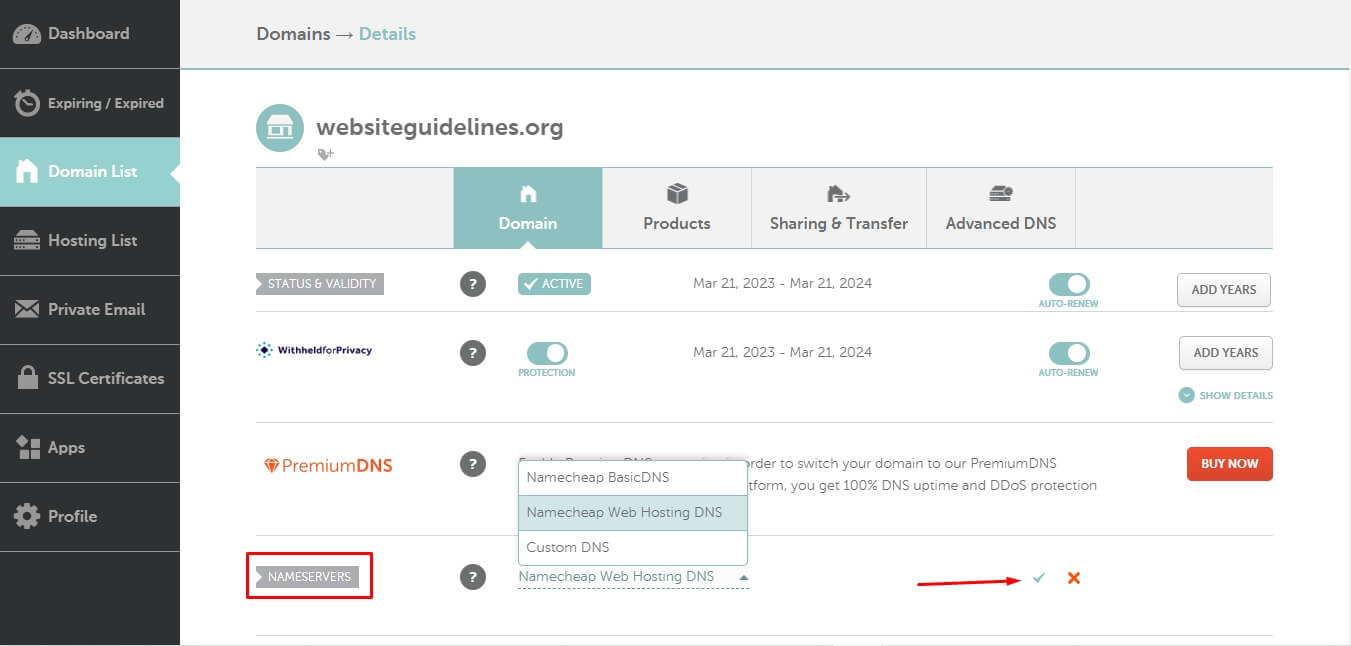
You can add a domain from any domain registrar, but before doing that, you must have your domain name pre-set to Namecheap Web Hosting DNS from the NAMESERVERS section of your domain details settings page.
Otherwise, you see an error message from the Addon Domain page, where you have more options to validate your domain name to complete this process.
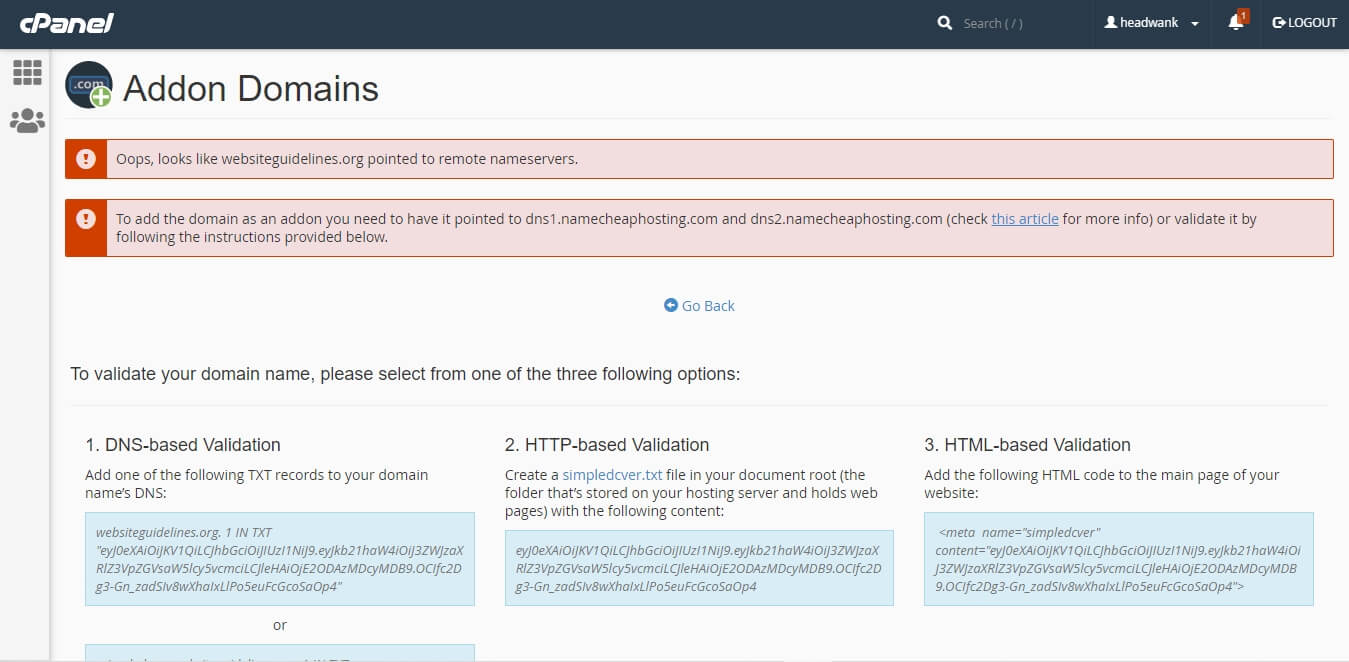
After that, the addon domain “websiteguidelines.org” was created.
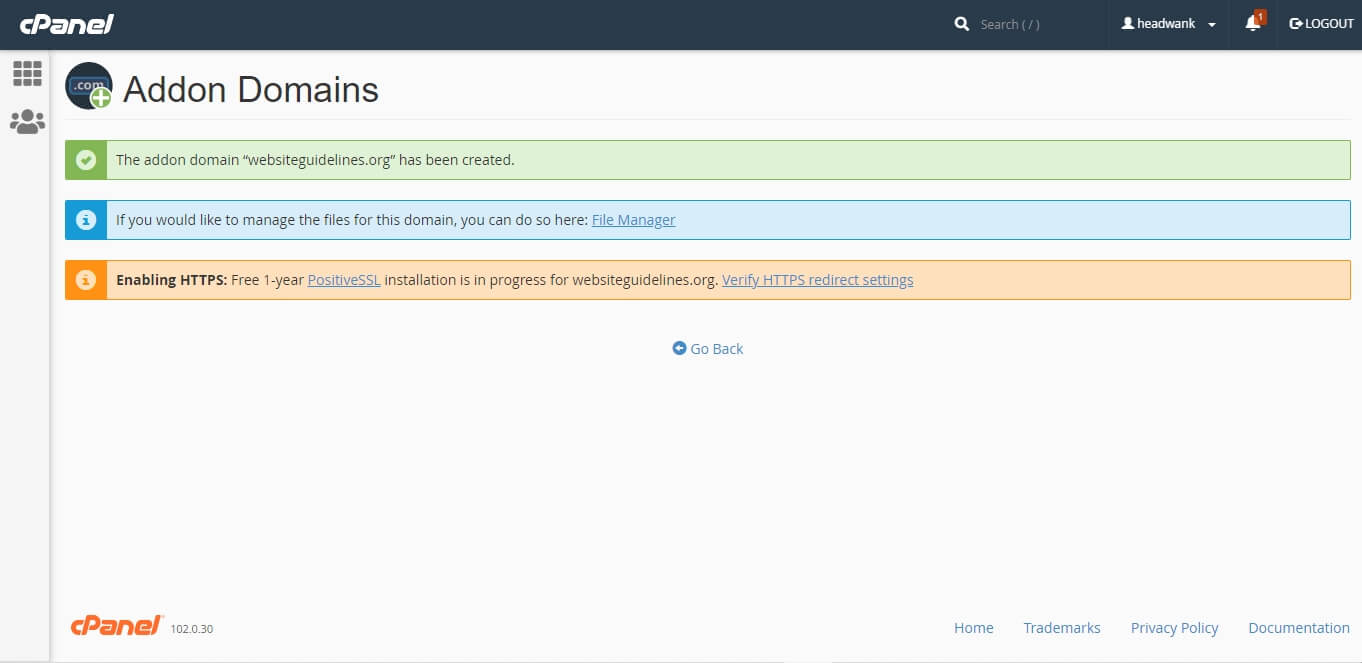
Also, Namecheap immediately installed the SSL certificate automatically for websiteguidelines.org.
An addon domain is an additional domain that the system stores as a subdomain of your main site. Use addon domains to host additional domains on your account. This is work as a fully functional website like your primary website, just it creates another directory in your public HTML section of the main site.
Connecting a Domain and Installing a WordPress Website
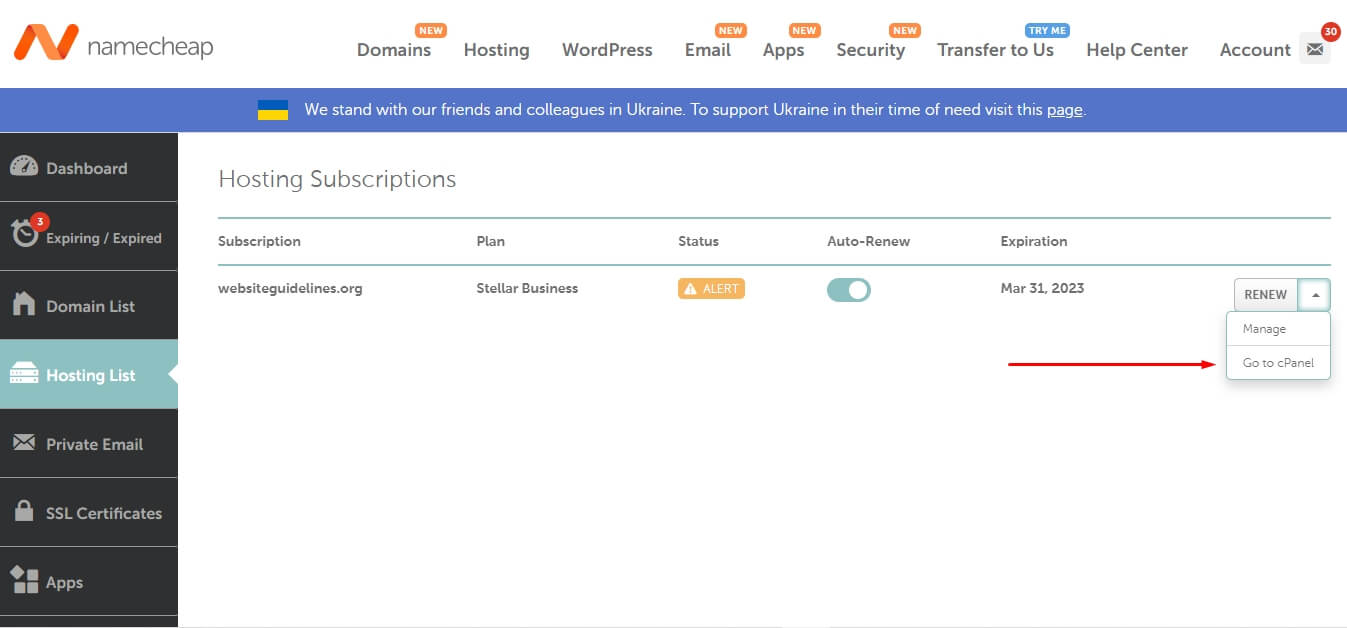
To create your WordPress website, you need to go to the cPanel from the Namecheap Hosting Subscriptions page. Click on Go to cPanel, and it will automatically redirect you to the cPanel dashboard.
From the cPanel dashboard, click on the Softaculous Apps Installer.
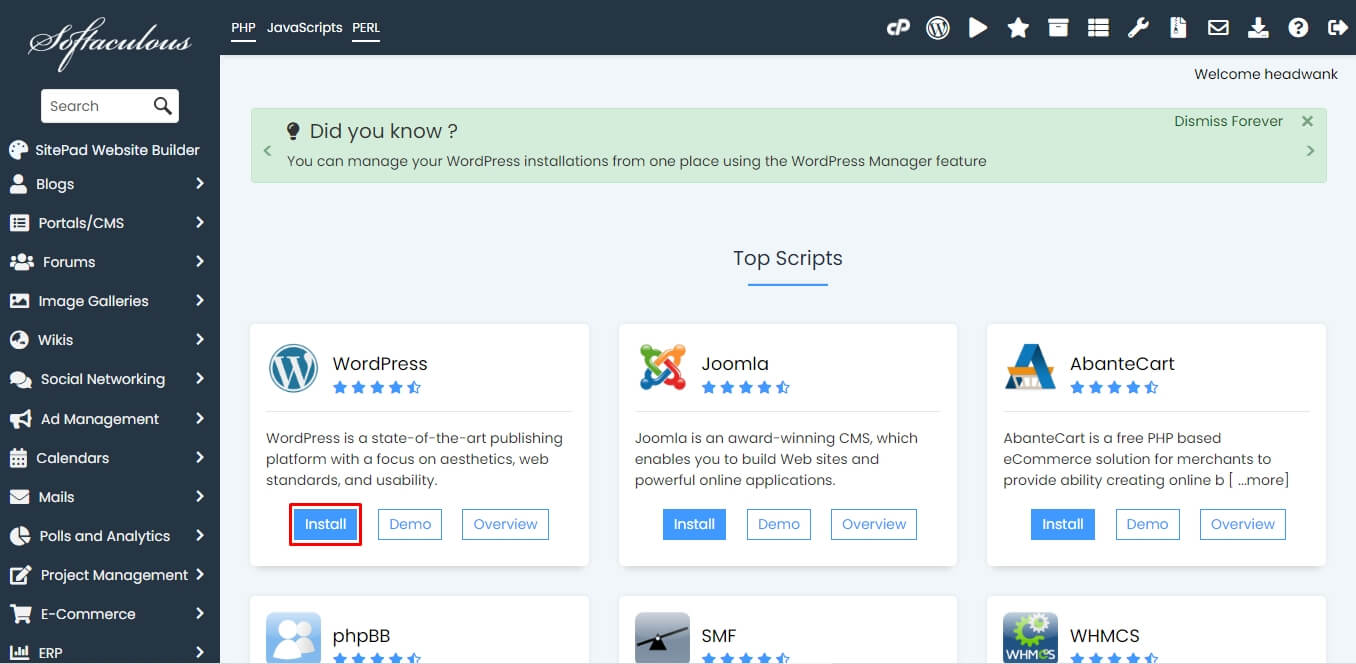
From the Softaculous Apps Installer page, click on WordPress Install.
Everything you need to complete the WordPress installation now:
- Choose Installation URL
- Specify any Installation Directory (blank is recommended)
- Choose the WordPress version you want to install
- Site Name
- Site Description
- Admin Username
- Admin Password
- Admin Email
- Choose Language
- Email installation details to
After all, you’ll see a welcome message from WordPress, which is Congratulations, the software was installed successfully.
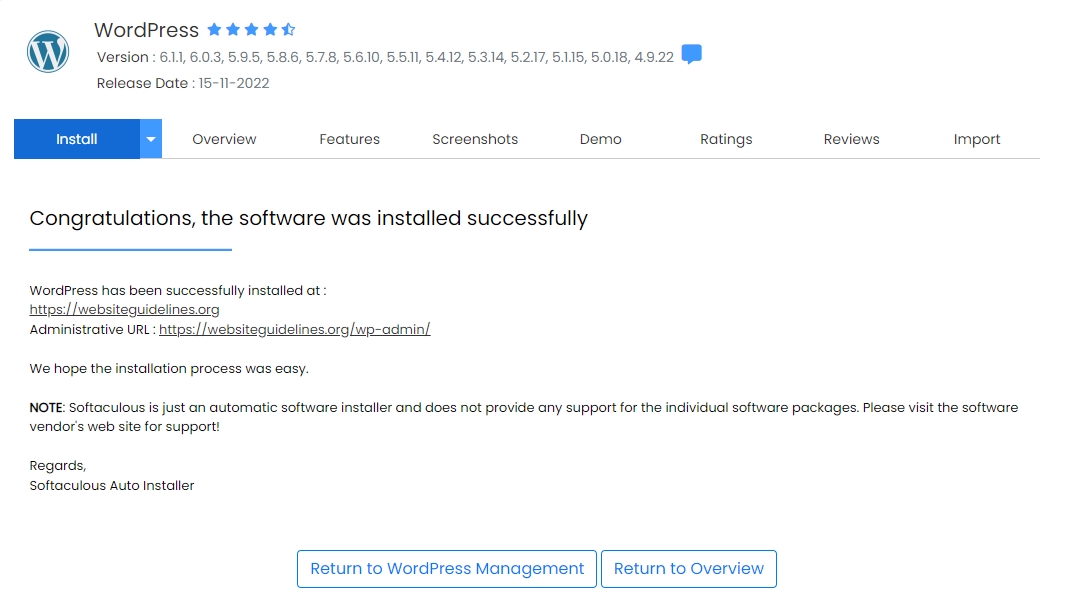
Then you can log in to your WordPress website admin panel dashboard using the admin URL that looks like https://yoursite.com/wp-admin/.
Setup SSL Certificates
SSL installation is an automatic process and takes a few moments to activate the SSL certificate. Namecheap is providing it for free for the first year of the SSL installation date for each domain name added with Namecheap.
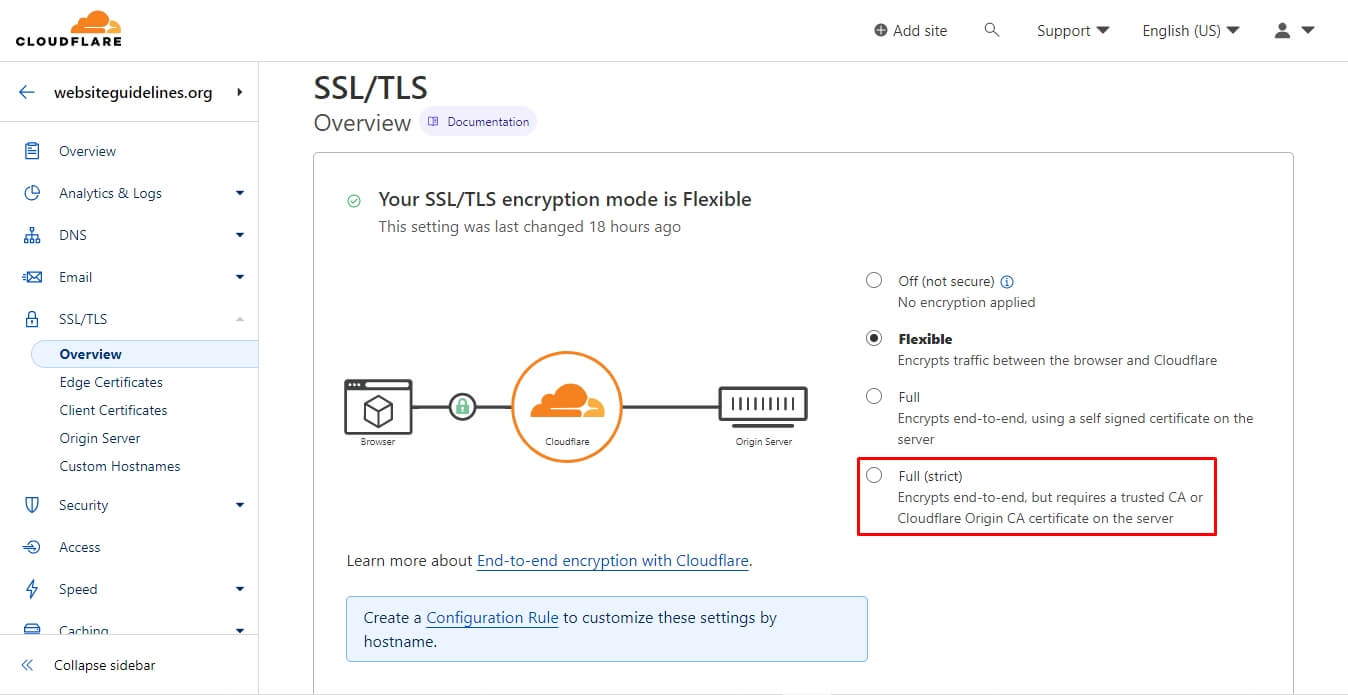
However, if you want to use Cloudflare CDN, then you must turn on Full (strict) encryption mode. It encrypts end-to-end but requires a trusted CA, which Namecheap has already provided, or a Cloudflare Origin CA certificate on the server.
You just need to switch Flexible to Full (strict) here:
Website Builder
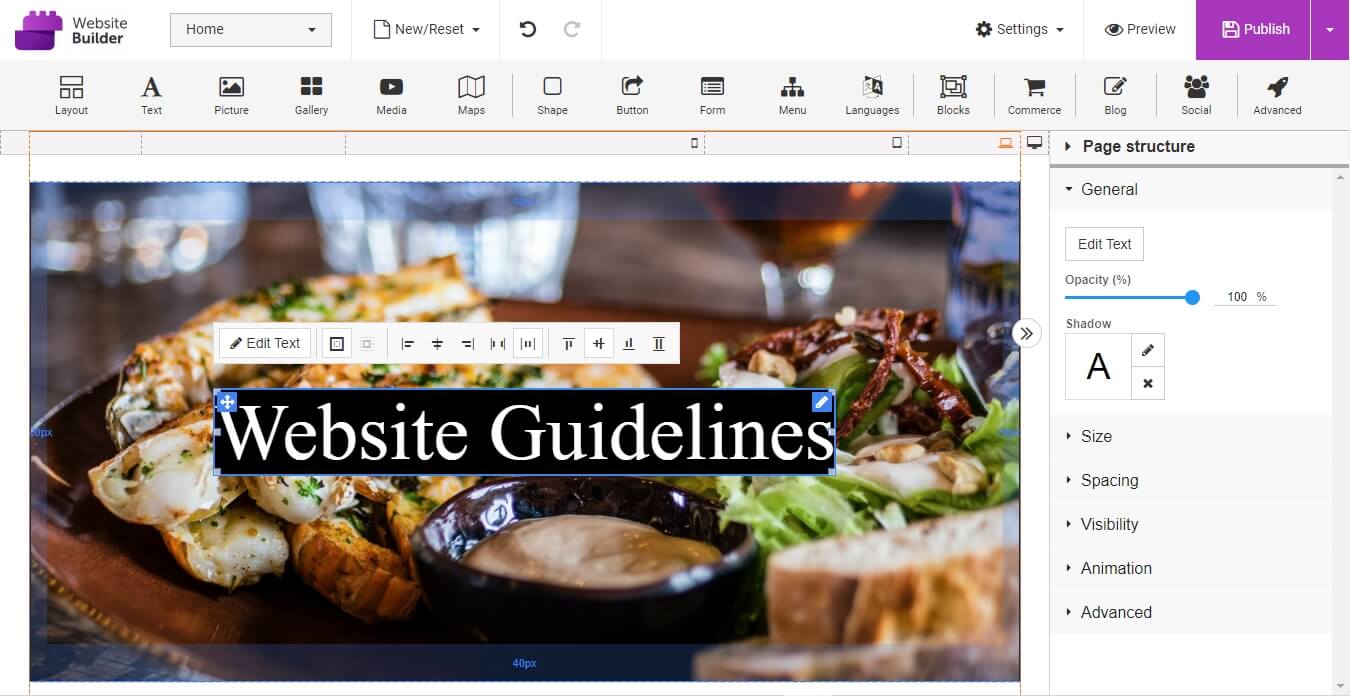
Namecheap offers an easy drag-and-drop website builder tool with all of their shared hosting plans. This can be helpful for those looking to create stunning landing pages with a premium-quality variety of pre-made templates.
Here’s a quick video overview from Namecheap:
FTP & File Manager Accessibility
From the cPanel search box, type FTP and go to FTP Accounts. type your information and create an FTP account to manage your website data quickly and securely.
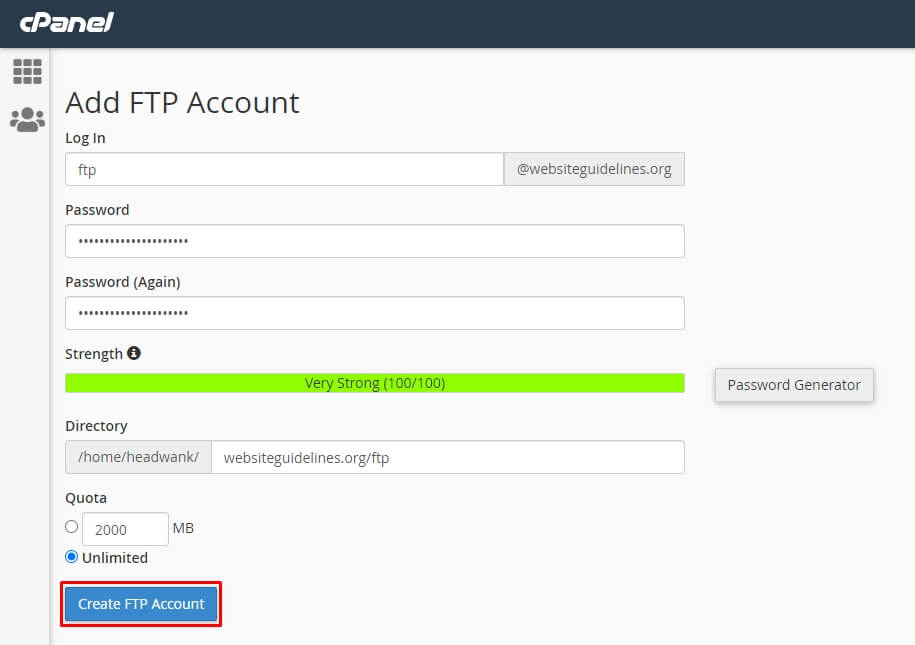
An FTP account is essential, especially when you want to create a backup and upload it to your server through Filezilla to restore your website. This would be a handier and faster solution than a direct WordPress dashboard.
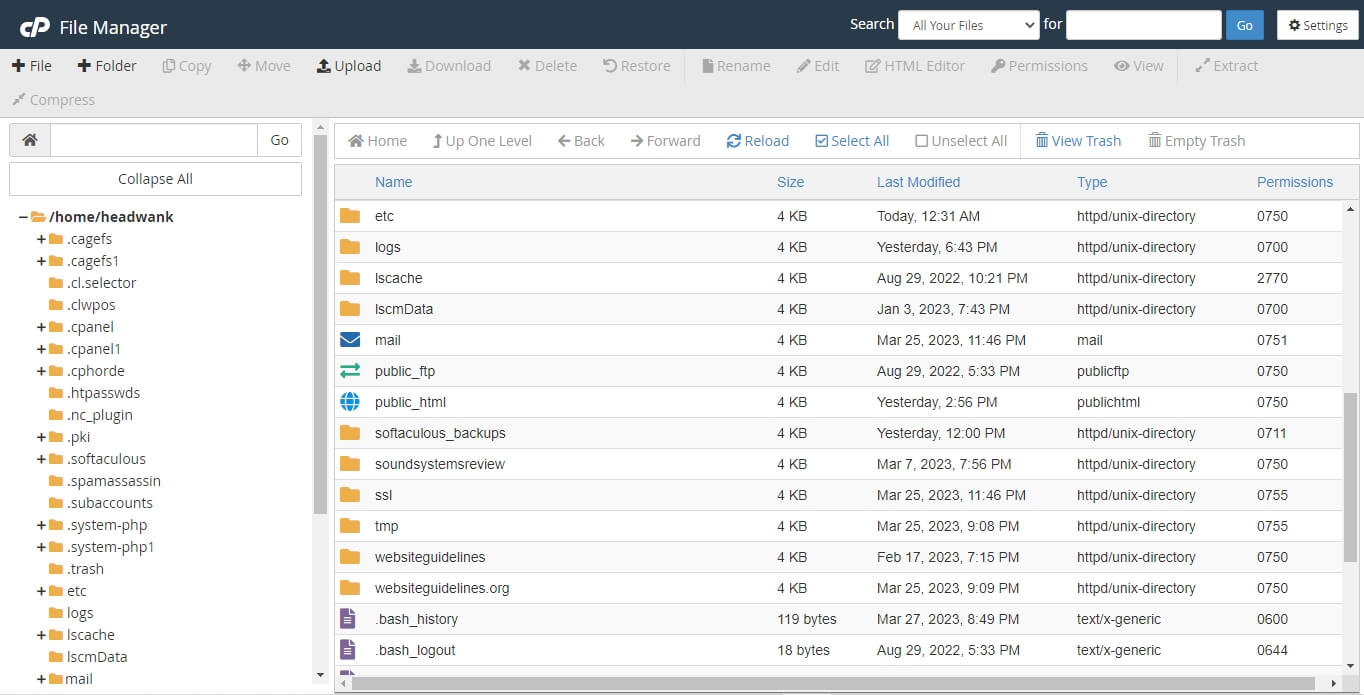
Also, the cPanel File Manager can help organize all the files in your account into folders. Use the File Manager interface to upload, delete, and edit your files.
Overall, Namecheap shared web hosting is not an ideal hosting for complete beginners, as it requires little technical knowledge and the ability to maintain everything yourself. Alternatively, you can try their EasyWP WordPress hosting managed by Namecheap which aims to make it easy for customers to manage their hosting accounts.
Performance
Databases Functionality & Backend Settings
PHP Tweaks
When I install a new site, I see an error on the WordPress dashboard related to an older version of PHP.
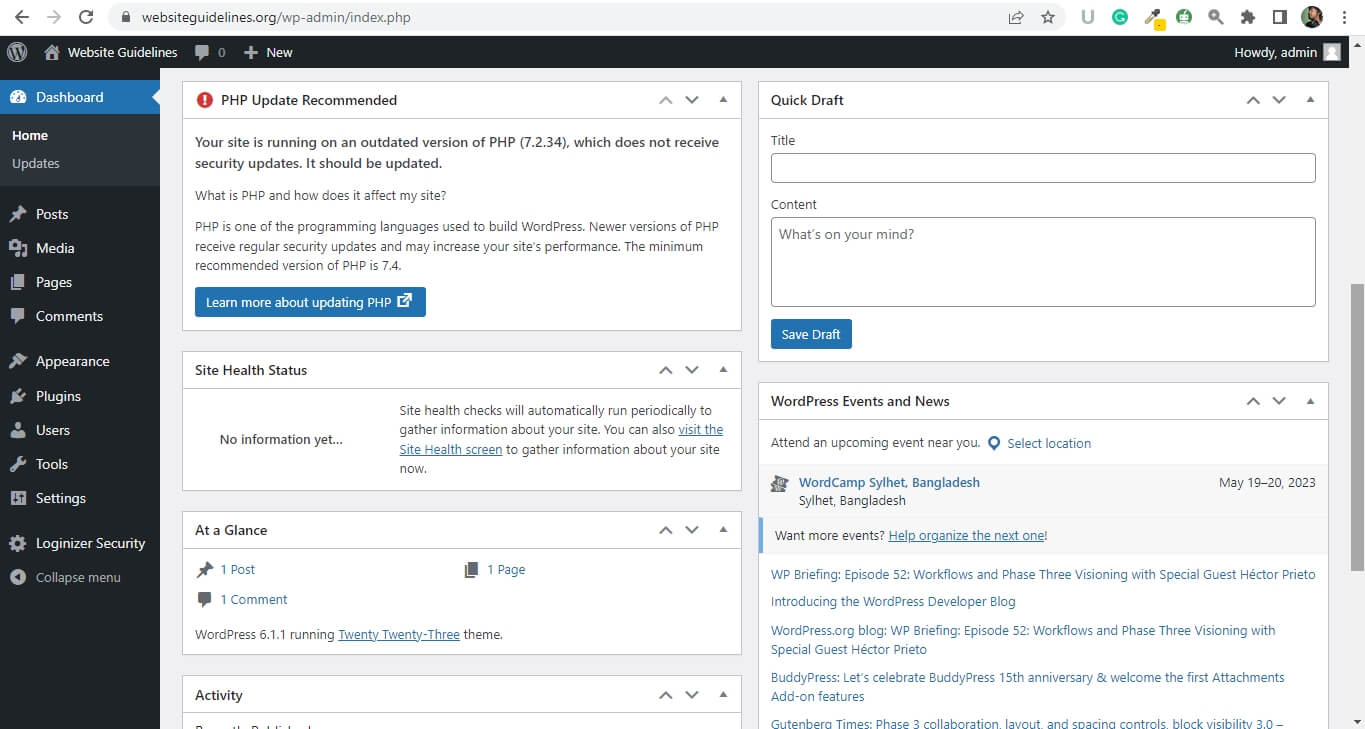
This is because, by default, the PHP version is set to 7.2, which is end-of-life and doesn’t work properly.
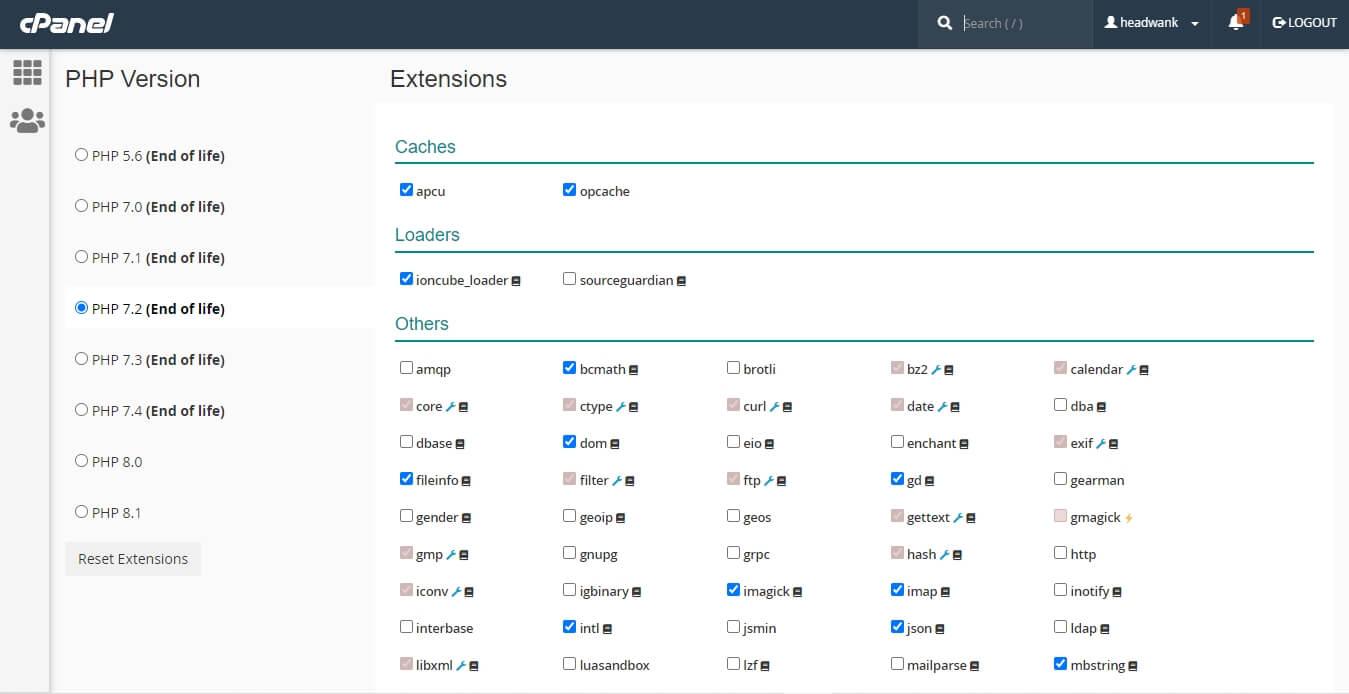
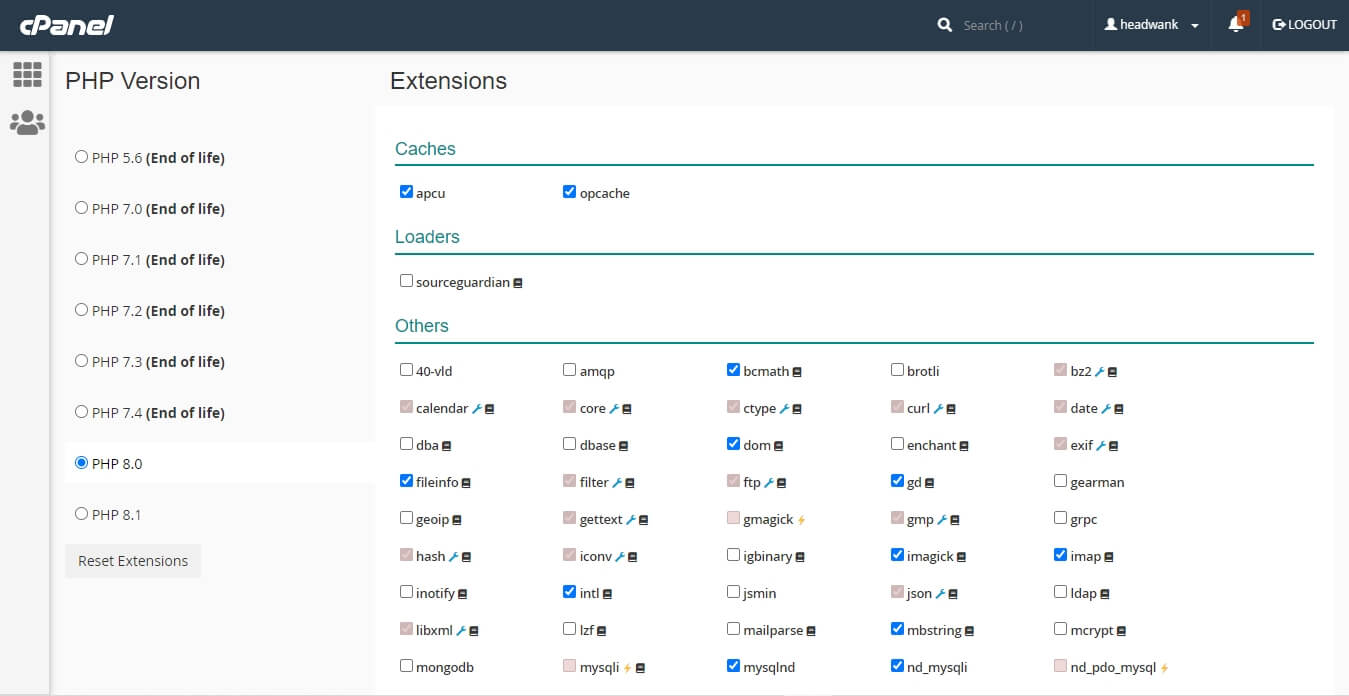
Go to cPanel, search “PHP Tweaks” and set PHP to 8.0 or 8.1. I use 8.0 for my sites.
Setup Python App
Namecheap gives you the ability to create and store any Python app with shared hosting packages.
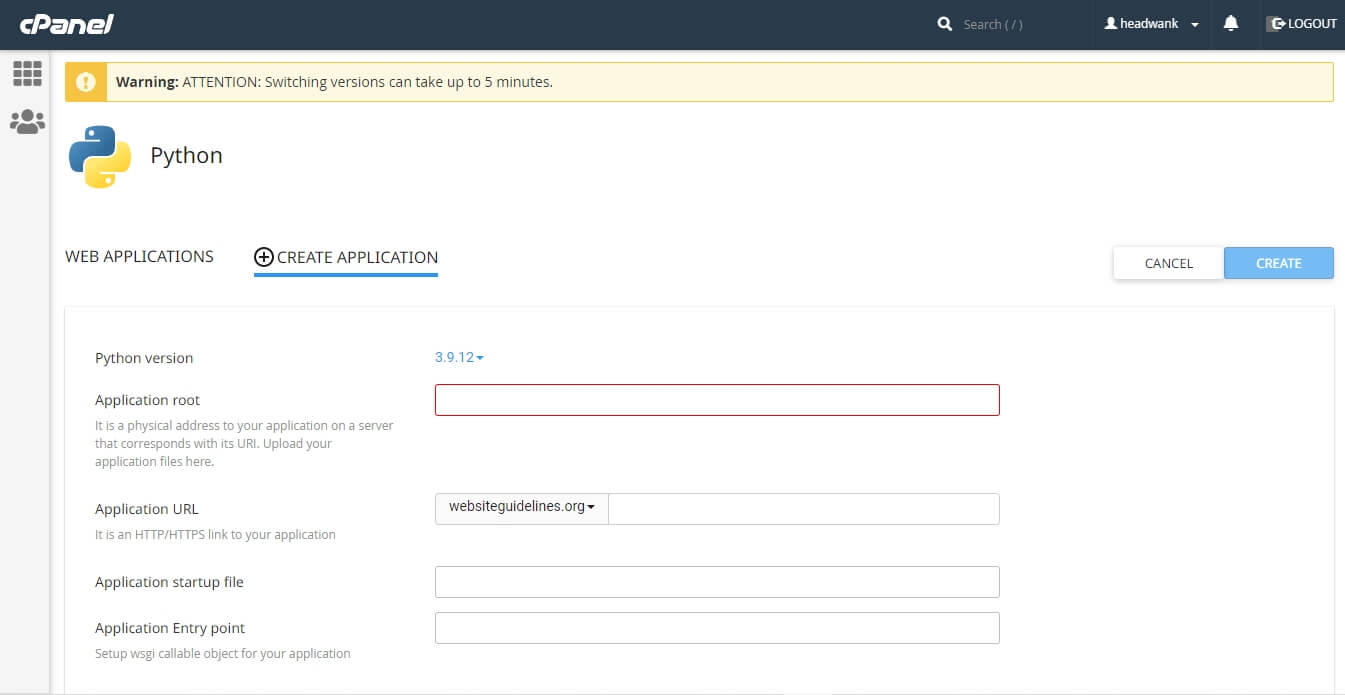
WordPress Python Integration allows users to integrate their WordPress site with any web application or online tool that can help your existing customers and boost SEO. Companies use WordPress and Python integration to connect their internal systems and enhance the digital experience.
Premium DNS
If you don’t want to use any third-party nameservers or any CDN services like Cloudflare, then it is better to use Namecheap Premium DNS to improve your site’s performance. Because it requires Namecheap Basic DNS or Web Hosting Hosting DNS, not Custom DNS. So with custom DNS, you can’t use Namecheap Premium DNS, but it can be used if your custom DNS provides it.
Caching
Website caching is the process of storing data in a cache, which is a temporary storage area that facilitates faster access to data. Nowadays, it is a crucial fact and a must-have technique to improve website speed and reduce bandwidth.
NameCheap’s shared hosting server is designed and developed with the LiteSpeed web server software system, and they have and provide a free caching plugin, which is LiteSpeed cache.
Initially, you don’t need this plugin to turn on the cache because it’s already on the server side with all other essential LiteSpeed settings built in. However, for maximum use of the caching, this plugin compares immensely.
This plugin can help to manage and customize everything related to website performance, including Cache Control Settings, CSS, JS, HTML, Media, Localization, and many more settings.
CDN
A CDN service is recommended when you get traffic from your website from all over the world.
Cloudflare is the best and most free-to-use and beginner-friendly content delivery network with enterprise-grade speed, security, and reliability.
Speed
Performance Test on PageSpeed
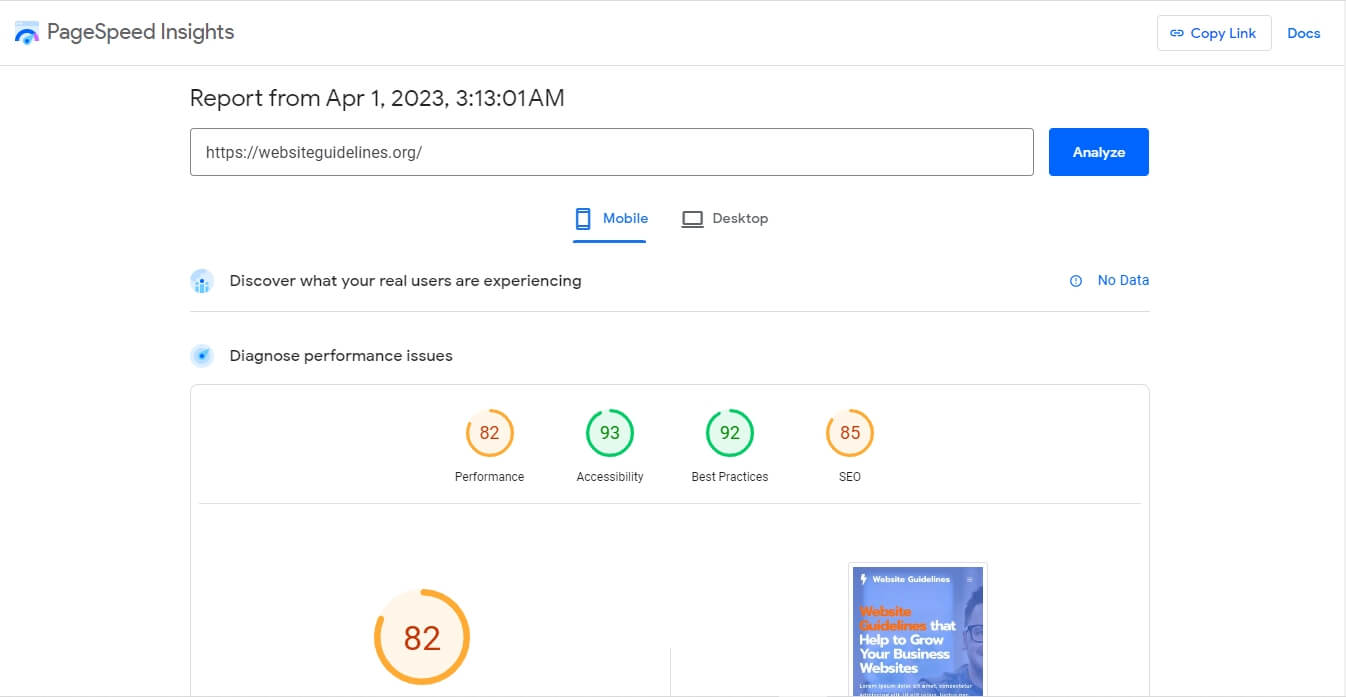
We’ve analyzed the websiteguidelines.org demo site, which is developed by Kadence theme with agency starter templates and a complete homepage solution on a professional pre-design website. Also, we’ve published six different blog posts with multimedia on the site to test and compare as a running site. Here’s what we found:
Real Users Experienced on Mobile:
- Performance: 82
- Accessibility: 93
- Best Practices: 92
- SEO: 85
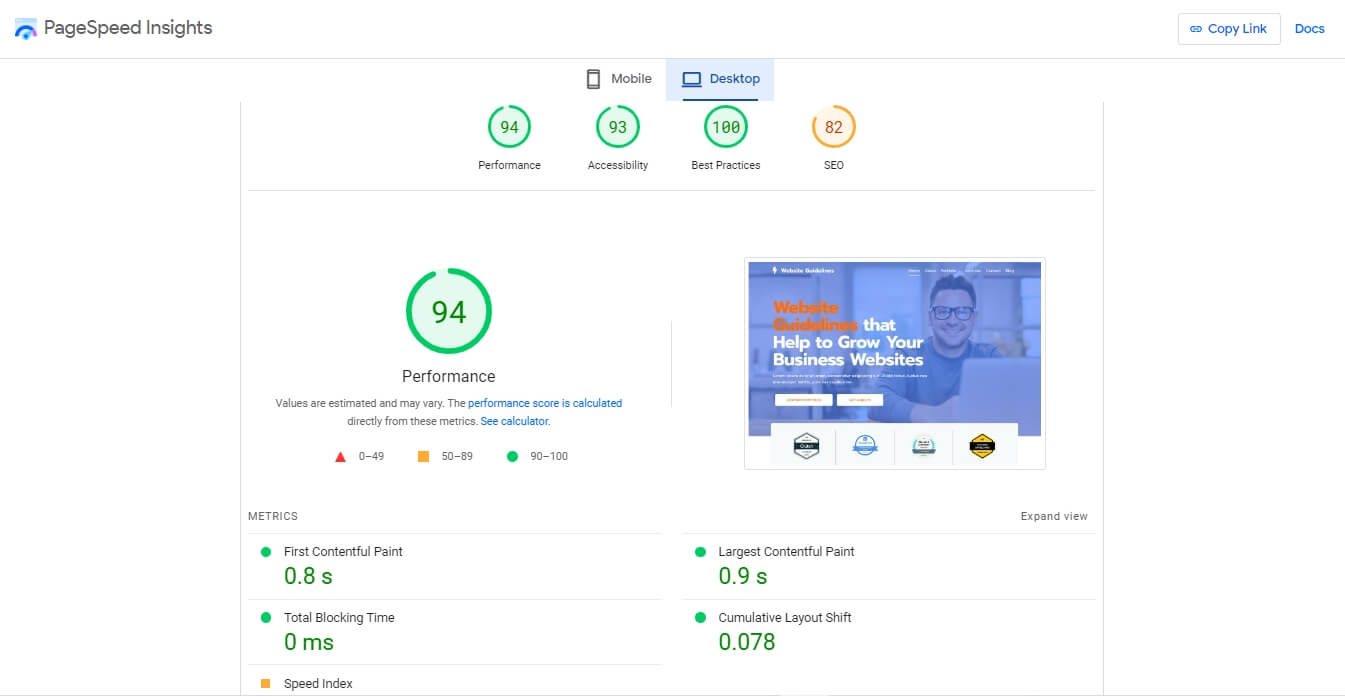
Real Users Experienced on Desktop:
- Performance: 94
- Accessibility: 93
- Best Practices: 100
- SEO: 82
# PageSpeed Optimize Opportunities (Mobile+Desktop)
- Reduce initial server response time: Choosing good hosting and using a CDN makes server response time short.
- Eliminate render-blocking resources: Resources are blocking the first painting of the page. Consider delivering critical JS and CSS inline and deferring all non-critical JS and styles by using one of the critical CSS WordPress plugins and the WP Plugin Manager can help.
- Serve images in next-gen formats: Consider using the Converter for Media WordPress plugin to automatically convert all your JPEG or PNG images to WebP completely free of charge.
Speedtest on GTMetrtix
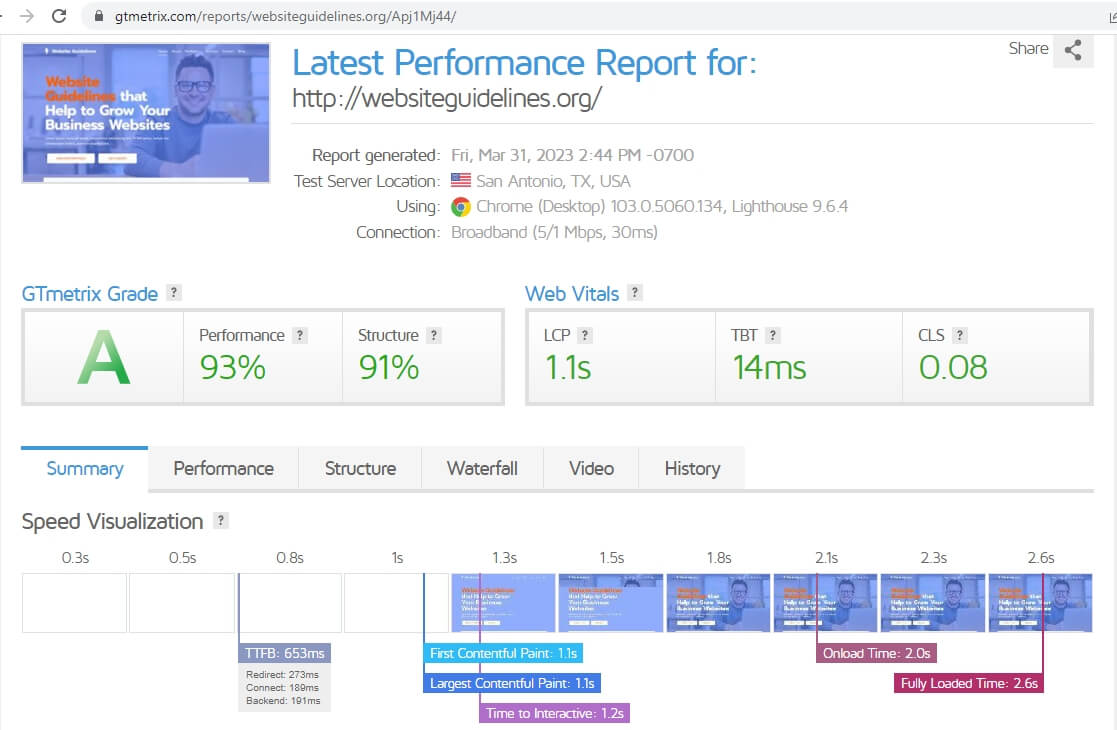
GTMetrix Generated Report Data:
- Test Server Location: San Antonio, TX, USA
- Hosting TTFB: 653ms
- Bowser: Chrome (Desktop)
- Metrtix: Lighthouse 9.6.4
- Connection: Broadband (5/1 Mbps, 30ms)
- GTmetrix Grade: A
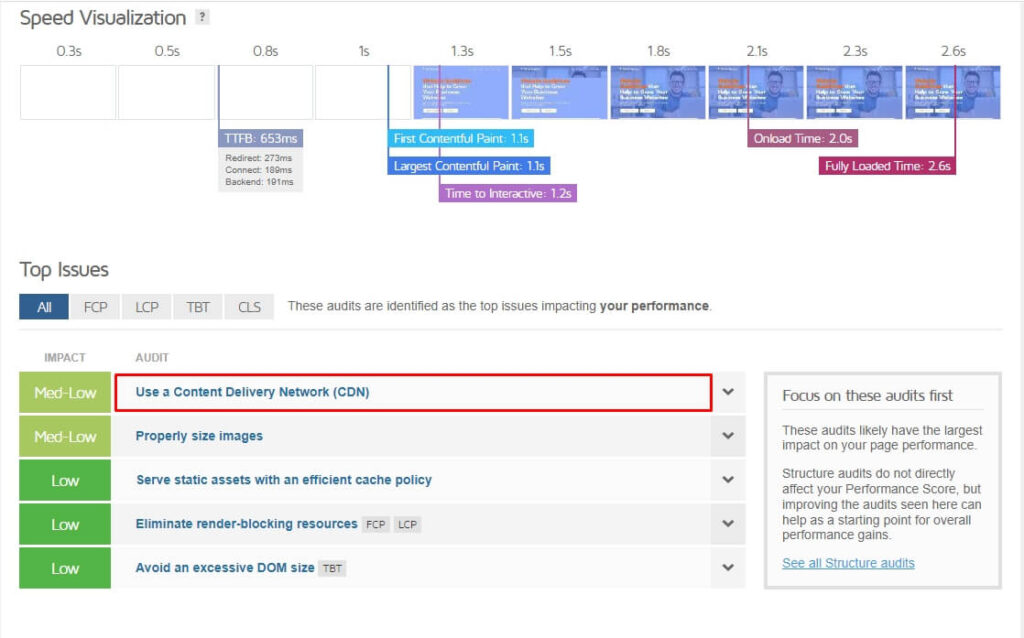
As you can see from the top issue related to CDN, we’ll also check Namecheap Stellar Business shared hosting with the Cloudflare CDN to see how it’ll perform in the next steps below.
Speedtest on Pingdom
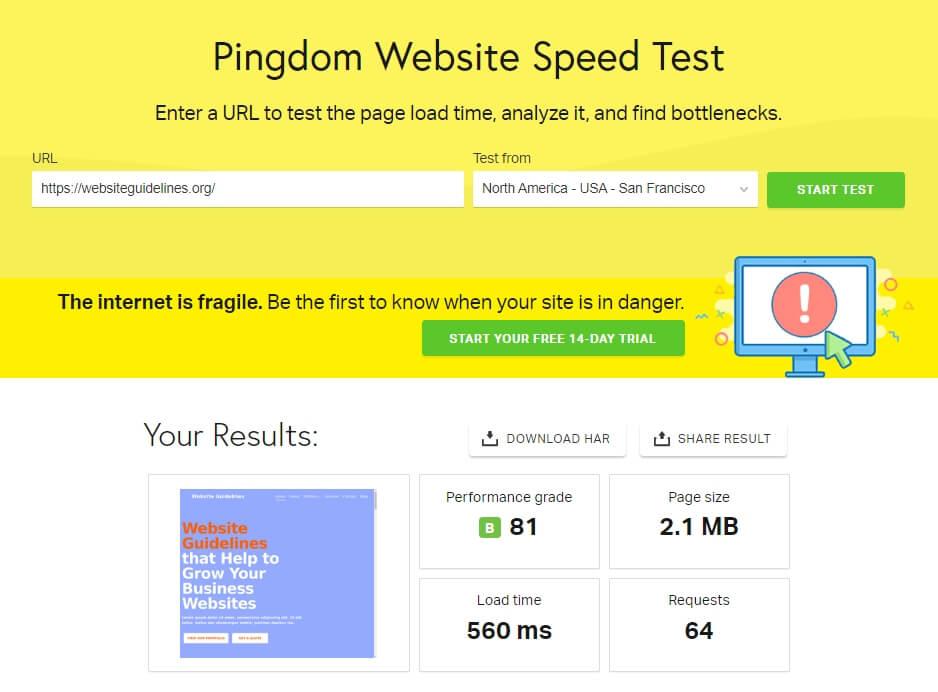
The Pingdom report finds the website load time is 560 ms, which is a pretty good time for shared hosting. If we can decrease the requested amount, then the website speed time will decrease dramatically, giving the ultimate page performance.
Improve page performance
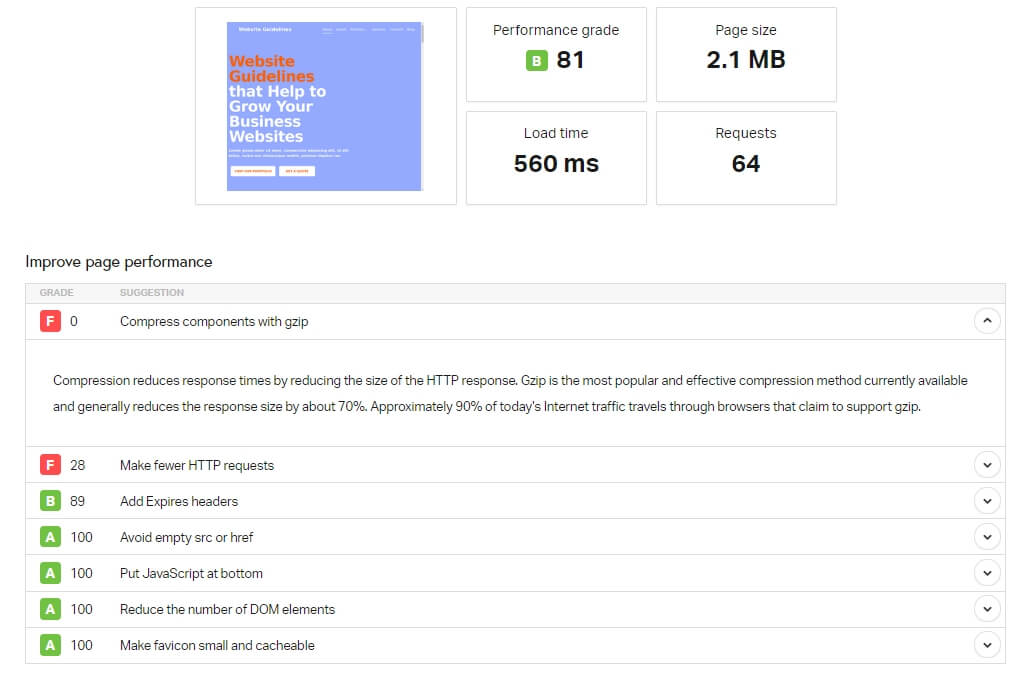
- Compress components with gzip: Using a compress gzip plugin or Cloudflare Brotli compression will speed up page load times for your visitor’s HTTPS traffic.
- Make fewer HTTP requests: There are lots of optimizations that can help reduce server requests; for example, storing Google Fonts and its CSS locally can decrease load times and requests per page by a significant amount.
Sucuri Load Time Tester
This test measures how long it takes to connect to your site and for one page to fully load for each location, including:
- Los Angeles: 0.626 seconds
- New York: 0.949 seconds
- London: 2.047seconds
- Sydney: 2.457 seconds
- Germany: 2.405 seconds
Uptime Reliability
Namecheap provides a 100% uptime guarantee with all their Professional, Ultimate, Business, Stellar, Stellar Plus, Stellar Business, and Dedicated server accounts.
I’ve been using Namecheap Stellar Business hosting for over 6 months now, and I haven’t had any downtime! Any hosting hosted on a cloud server is reliable for uptime.
Here’s my hosting validity period (I use a monthly-based subscription, which costs me double the yearly plans).

The Namecheap status page provides all the information related to their service and systems, including uptime and any other performance or integration issues or service update notices made publicly.
Uptime.com Test
Uptime statistics chart provided by uptime.com.
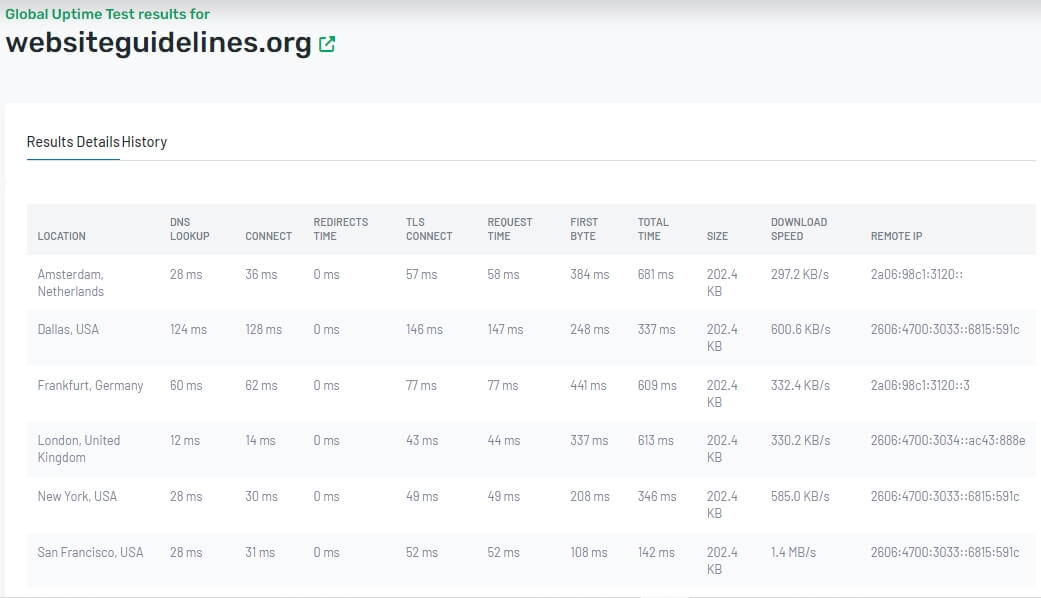
Overall, Namecheap's stellar hosting performance isn't bad at all. Make sure you enabled CDN (Cloudflare) to improve your site performance globally. However, it is reliable and provides great uptime and speed as an affordable hosting service.
Support
Live Chat Support
The weak point for me is the support time. It takes so many attempts to answer the questions or provide solutions as requested. Namecheap Live Chat Support Agent roughly takes 10 minutes for a simple question to answer, reply, to or solve any issues.
When I explained the problem in detail, they simply asked me every time, Please allow me 5–10 minutes to check the case, and then he or she replied with a solution or any opportunities to discuss.
However, the Namecheap live chat support is instant to connect with them, but it needs some time to complete the live chat session and provide a solution, giving me an average of 1 hour. Which is pretty large compared to any other hosting provider.
Still, I love them as they are well-trained and experienced in the specific field. They take some time but can come up with solutions.
Ticket Assistance
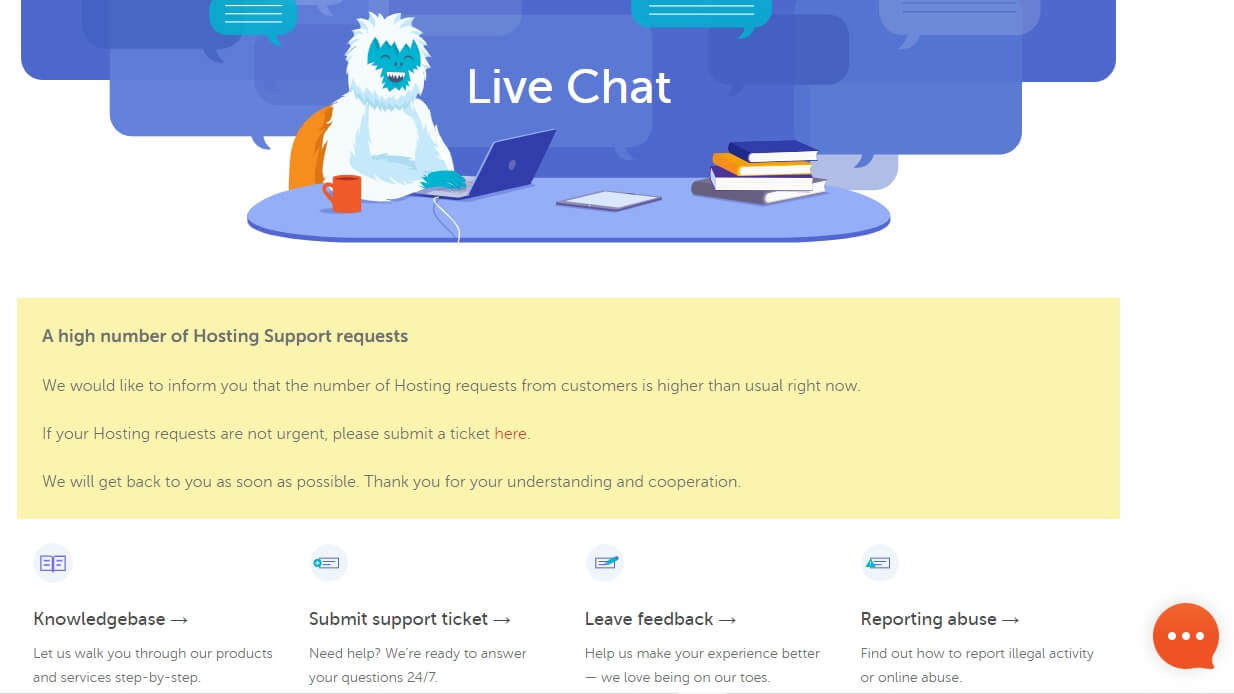
A high number of hosting support requests are pending most of the time. That is why they would like to solve your issue related to your hosting account and technical details via the ticket system. Typically, replies arrive within a day or two.
They don’t offer support over phone calls. Usually, I prefer Live Chat support, and it is pretty much instant to connect with them.
Support Capability and Customer Feedback
Their support agents are well-trained and capable of handling any issues related to their service. Sometimes they helped me with other matters. Which makes them a reliable hosting provider.
Namecheap provides excellent support but it takes many times to investigate for providing solutions in Live chat or Ticket systems.
Pricing
Compare Specifications and Prices of Namecheap Shared Hosting Plans
The Namecheap prices are straightforward and worth considering for the yearly plans. I do not recommend any monthly plan for getting the most out of your money.
However, it depends on your needs. But my advice to you is to get a 1- or 2-year plan if you’ve got a plan and are currently looking for an affordable hosting solution to start your journey.
Money-Back Guarantee
If you’re not fully satisfied with their hosting services, you can receive a full refund within the first 30 days. Remember, only first-time shared hosting customers are eligible for a refund.
Namecheap is transparent about their pricing — they clearly state what they're charging for hosting now and later.
Pros and Cons of Namecheap Shared Hosting Plans
- Affordable
- Flexible Billing Option
- Free Automatic Premium SSL
- Most Secured Server
- Best-in-class Support
- Do not offer a free .com domain with annual plans
- Low physical memory (RAM)
- Supersonic CDN is worthless
- ModSecurity is disturbing
- Takes too long to provide support
If you don’t want to buy Stellar Hosting or EasyWP hosting from Namecheap then the following hosting services will be better as an alternative:
Namecheap Stellar Hosting Alternatives


Conclusion
Finally, Namecheap shared hosting comes with at least three websites and 20 GB SSD storage of entry-level stellar plan. This is ideal for solopreneurs or bloggers who want to start a new blog or personal portfolio website on a tight budget.
However, Namecheap’s Stellar Business plan is great shared hosting hosted on cloud servers. Offering excellent performance and overall high speed for both low to medium-traffic websites with flexible and affordable monthly and annual billing options!
Otherwise, consider Stellar Plus when you require unlimited SSD disk space, unlimited website support, and unlimited domain-based mailboxes.
Remember, I do not recommend Namecheap shared hosting for heavy-traffic websites due to a lack of physical memory (RAM) and shared environments.
Which hosting plan do you prefer now for your websites — Is it Stellar Business or what?
I hope today’s review of the Namecheap shared hosting was helpful for you!
If yes, please write your feedback or any suggestions in the comment box below, and feel free to reach out to us using our contact form. We’ll be happy to hear your thoughts.
FAQs
User Reviews
Top reviews
SCAM VICTIMS, RECOVER LOST FUNDS
I was a scam victim, I lost a lot of money up to $170,000 I would like to express my gratitude to Innovations recovery Analyst for their exceptional assistance in recovering my funds from a forex broker. Their expertise and professionalism in navigating the complex process were truly commendable. Through their guidance and relentless efforts, I was able to successfully recover my funds of $170,000, providing me with much-needed relief. I highly recommend them on – INNOVATIONSANALYST@ GMAIL. COM or WhatsApp + 1 424 285 0682 to anyone facing similar challenges, as their dedication and commitment to helping clients are truly impressive. Grateful for their invaluable support in resolving this matter.
RECOVER LOST FUNDS
I was a scam victim, I lost a lot of money up to $170,000 I would like to express my gratitude to Innovations recovery Analyst for their exceptional assistance in recovering my funds from a forex broker. Their expertise and professionalism in navigating the complex process were truly commendable. Through their guidance and relentless efforts, I was able to successfully recover my funds of $170,000, providing me with much-needed relief. I highly recommend them on – INNOVATIONSANALYST@ GMAIL. COM or WhatsApp + 1 424 285 0682 to anyone facing similar challenges, as their dedication and commitment to helping clients are truly impressive. Grateful for their invaluable support in resolving this matter.
Very detailed review
I’m impressed with your review, it’s very detailed. I am confused to consider whether I will choose namecheap stellar business package or cloud VPS. Considering my needs which do not require very large resources and the use of VPS is intended for users who have Linux SysAdmin knowledge.
A cheap web hosting plan but
Namecheap Stellar Business hosting really works for me; I tried some of the other shared hosting companies before them, including GoDaddy and iPage. But finally, I got my hosting, which I really loved. Outside of that, the Namecheap support is great.


